Blog
Exploring Blocks Sampler Quilt
Hi!
It’s time we went exploring – exploring blocks that is! Over the course of the next 10 months, we’re going to make and manipulate some different, classic quilt blocks to make a fun, big Sampler Quilt.
You will be amazed at just how different some of the blocks will turn out in the end, and I think it’s always a good thing to stretch your quilting brain a bit, and have a play sometimes, and see just what you can create.
Think of this as a mini course quilt-a-long, and together we’ll work our way through a set of 9 quilt blocks, and create a bunch more!
Just like a regular Block of the Month program, my plan is to work through a block a month with you on this blog, and the final month will be all about how to put them together into this stunning quilt.
So let’s get started! Gather your quilting supplies, and get ready…
Exploring Blocks Sampler Quilt
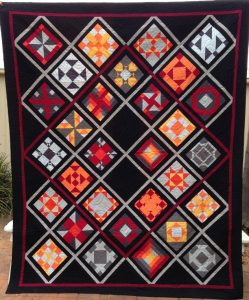
This year, we thought we’d go exploring… Quilt Blocks, that is! Over the course of this year, we’re going to take a good look at a different block each month, and we’re going to investigate some fun ways of playing around with these classic blocks, to discover whole new layouts and designs.
Of course, there’s not much point making practice blocks without then being able to do something with them at the end, so after our final block in the series, we will show you how to put them all together into a fun Exploring Blocks Sampler Quilt, so it’s always there and easy for you to use as a reference for when you want to try some of these blocks again in other projects.
For This Project You Will Need:

As the blocks will all be incorporated into a quilt at the end, we chose to make our blocks from a selected range of colours. What you choose to do is up to you, but we selected plain colours for ours.
You will need at least a ½ metre/yard of each fabric. We want a more modern looking quilt, so we chose 8 colours, ranging from a maroon, red, orange, yellow, charcoal, pewter, silver, to a very pale blue. We bought slightly more of each fabric, but this was just to piece a quilt backing from as well.
At the end, you will need also to add fabrics for the sashing and borders, but you can leave this until the final month, as you will not need them until then.
All blocks will start as 10 inch blocks. Please try to keep your seam allowances consistent, as this will make it easier to manipulate the blocks. (Consistency is key here – if you sew with an accurate 1/4 inch seam, then continue to do so. If your regular seam is slightly over, or under the 1/4 inch, then that’s fine too, as long as you keep to the same seam width throughout, then it will all go together fine!)
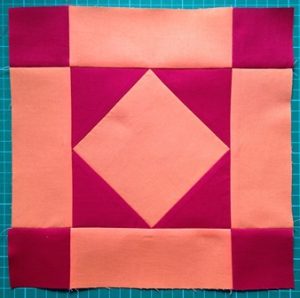
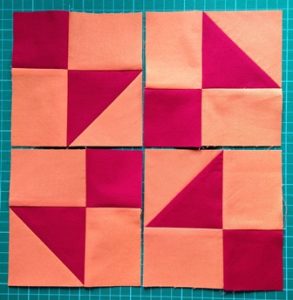
Block 1 – New Album Block
You Will Need:
Two fabrics that contrast. We used the maroon and orange fabrics for this block.
* You will need to make three of these 10 inch New Album blocks, and the quantities to cut below are to make all three blocks.
Cut:
From the maroon fabric, cut 12 squares, measuring 2½ x 2½ inches
From the maroon fabric, cut 6 squares measuring 3.7/8 x 3.7/8 inches, and cross cut in half diagonally once, to make 12 triangles.
From the orange fabric, cut 3 squares measuring 4¾ x 4¾ inches
From the orange fabric, cut 12 strips measuring 2½ x 6½ inches
Assembly:
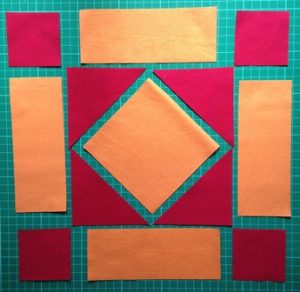
Lay out your block pieces as pictured here.

Start by joining two opposite triangles to the centre square/diamond.
Press well.
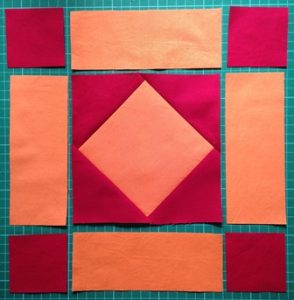
Then sew the remaining two triangles to the two other sides, so you have a diamond in a square.
Press and trim off the ‘dog ears’ from the seams.
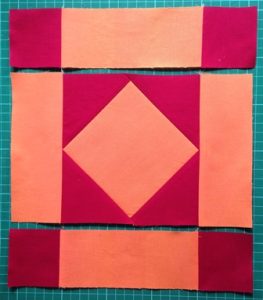
Join your pieces into three rows, as shown.
When you press the seams, press the top and bottom rows so the seam allowance faces towards the middle, and press the centre row so the seam allowances face out. This will help nest the seams when you join the rows together.
Finally join the three rows together and press your block well.
Make two more blocks just like this.
Used by itself, this New Album Block has some pretty design options.
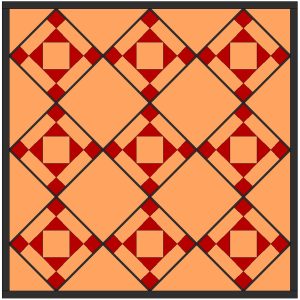
4-Patch:
And now the fun starts! This block can also be cut into a 4-patch block, the units rotated, and re-pieced, for a completely different block.

Cut one of your New Album blocks into 4, as shown.
As your finished block should measure 10½ inches square, you should be able to cut in half vertically once at 5¼ inches, and do the same horizontally.
However – if your block is slightly out, don’t worry – make the cuts so they run straight through the points of the centre diamond, so that each quarter is cut evenly to match the design.
Rotate the top right and bottom left quarters so that the corner little squares now meet in the centre of the block.
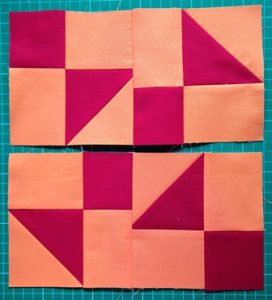
Sew together in pairs, and press the seams so they face in opposite directions.
Join the pairs together to re-complete your block.
Yes – you will lose the points of the centre triangles, but this just adds to the charm of this block variation.
Also – as you have cut and re-pieced your 10½ inch block, the finished block will now be about a ½ inch smaller all round.
This is fine, and we will take it into account when we put the quilt together.
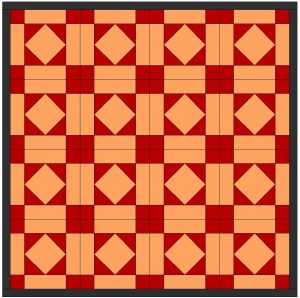
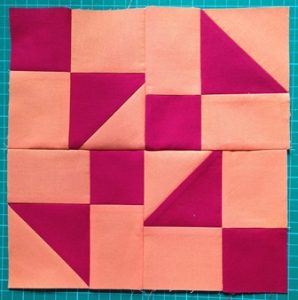
9-patch:
And don’t stop there! Now let’s try a 9-patch as well!!

This is not an even 9-patch.
Again, measure your block to double check, but you should be able to measure and cut 3 inch wide strips vertically from each side, and again horizontally across top and bottom, as shown.
Most importantly, make sure the cuts are even – so the same size point is cut off each of the centre diamond points.

For this block, rotate all of the sides.
Turn the corner squares 180 degrees, so the big square points in, and turn the side strips so the small triangle is to the outside.

Carefully piece the units together into rows, and press so the seams alternate direction between the rows.
Finally join the rows together to reveal your new re-pieced 9-patch New Album Block.
As before, this finished block will be smaller than your original block (approx. an inch), but we will take care of that when we assemble the quilt top at the end of this project.
And there you have it! I hope you’ll get started on this block this month, and we’ll keep exploring blocks with a different set next month.
Remember, you can choose whatever fabrics you like for this, and get stash busting, but I do recommend plainer rather than fabrics that are too busy, or you’ll lose the effect of the different blocks.
Enjoy your month!
